
Hey everybody, Chris here.
I got recently aware of the fact that one major bounty of the Gitcoin NKN hackathon wasn’t done yet so based on https://gitcoin.co/issue/nknorg/nbounty/1/100026444 I decided to create my very own NKN satellite miner.
Goal and scope of this project
Since Starlink entered the market Satellite internet has become the most fitting solution for people living in rural areas. The goal of this project is to run an NKN node on a Router that is directly connected to the Starlink Dish. There will be some obvious roadblocks we need to circumvent, though:
- The Starlink Router is pretty “basic” and doesn’t allow the installation of custom software on it. Because of this, it needs to be replaced with a custom-built one.
- Starlink’s routing system uses CGNat. This makes it impossible to forward any ports for our public IP. We need to work around this.
Well, when I said roadblocks I meant ROADBLOCKS. At first sight, it seems to be impossible to run an NKN node with at least Starlink as your provider — Right? Wrong!
So without further ado let’s start with the things we need:
0. Equipment
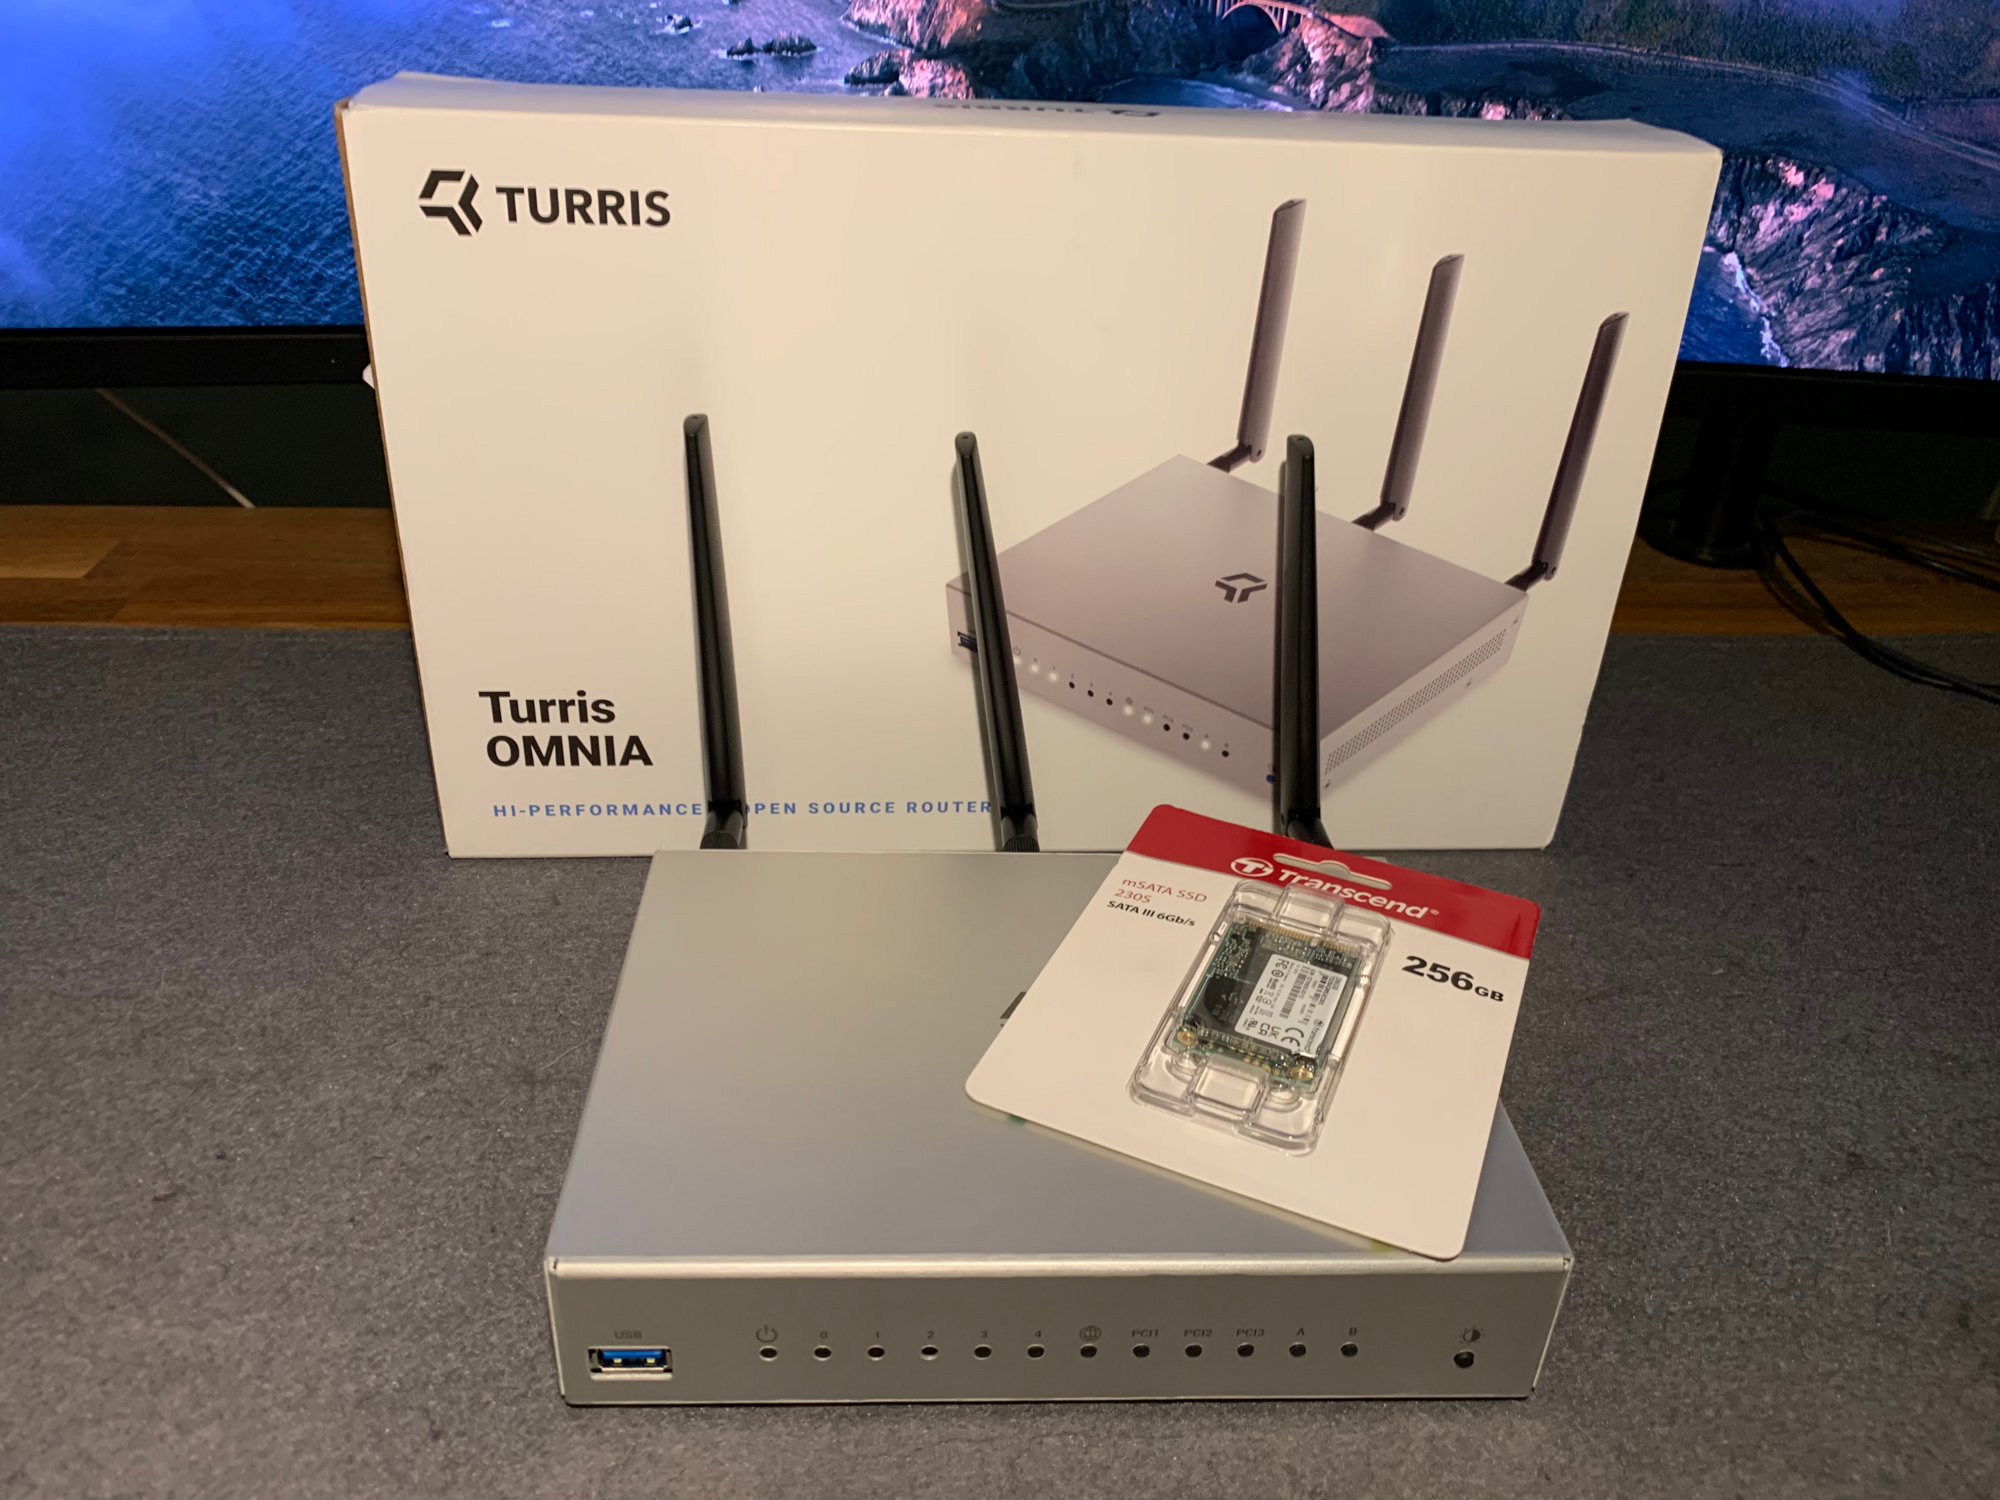
Before we start hacking our way to success we first need to do some shopping. For this project I bought:
-
A Starlink Kit, which includes all of the necessary hardware, such as a small satellite dish, as well as a router ( that we directly throw into the bin), power supply, and mounting tripod.
2.558,00 EUR* - A good OpenWRT-capable router, in my case a Turris Omnia 2020.
4.345,00 EUR* - An mSATA SSD with 256GB to store the NKN local blockchain on it.
6.40,99 EUR* - A third-party hosted server with a static IP — in my case a small DigitalOcean Droplet.
8.10,00 USD/month* - Screwdrivers, a USB Flash Drive, your PC/Mac, network cables, and a lot of time to figure it out
10.priceless*
With this, we are all set to build out an an NKN satellite miner. So let’s go to work!
1. Hacking the router
Adding the SSD
Our first concern will be our new custom-built Router. Because the storage capacity of the Turris Omnia is not enough to store the whole NKN blockchain we will add an additional SSD to it. Luckily there is a video tutorial for this:
Worth mentioning here: on the newer 2020 model the connector cables are so short that I needed to swap some around (without changing the connected pins of course) to make it work: Note to Turris: please don’t save on cable lengths, thank you!
So tl;dr I came from this:
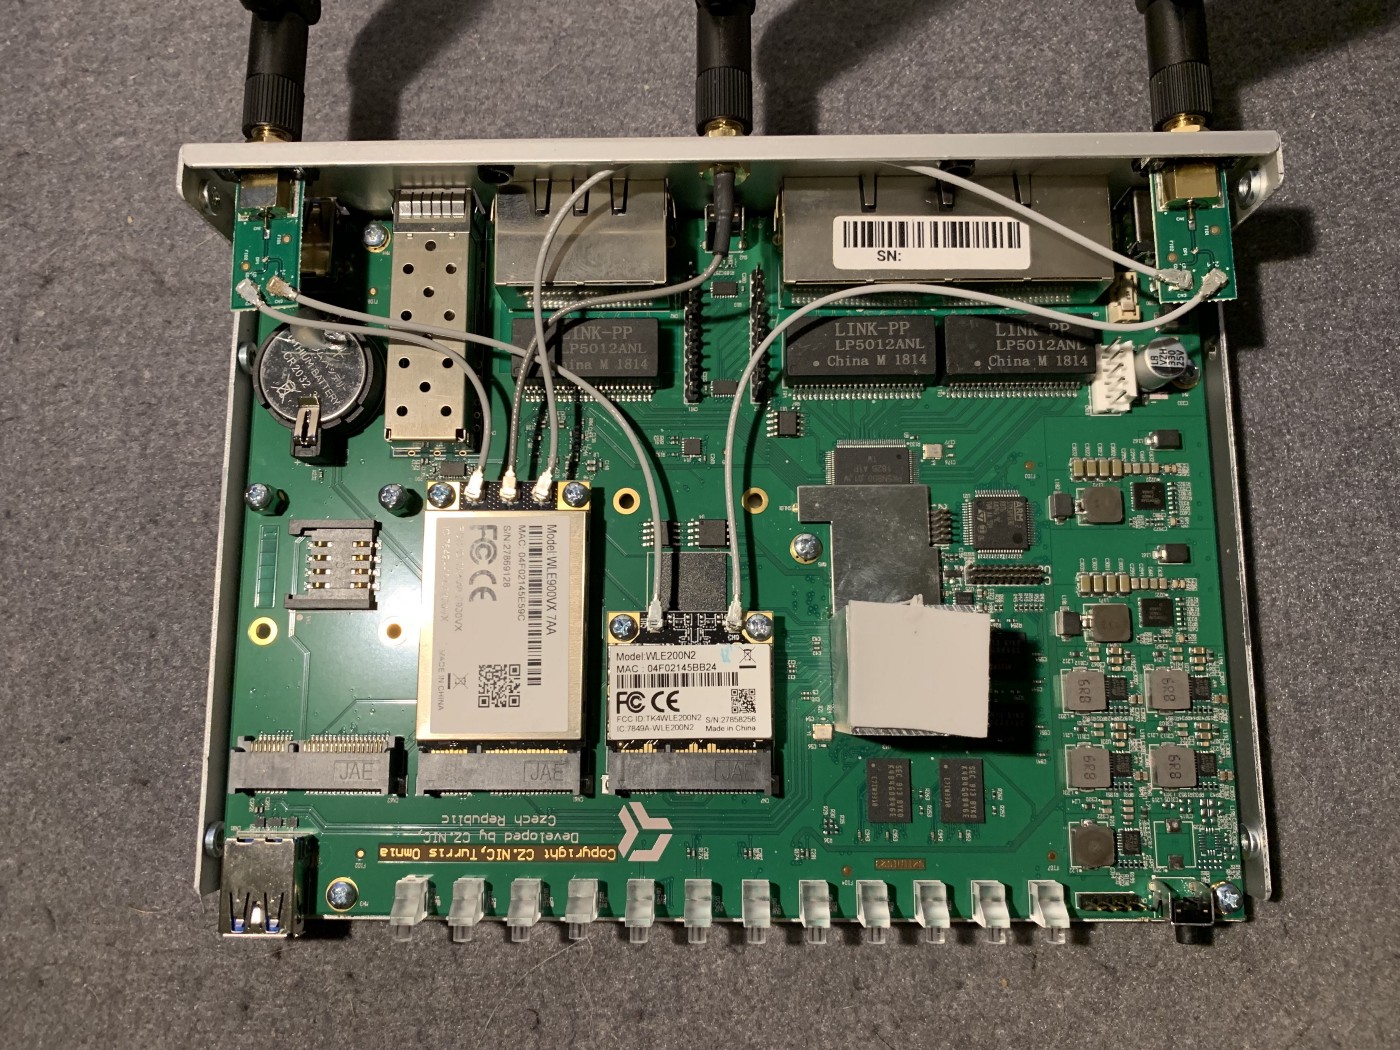
and ended up on this:
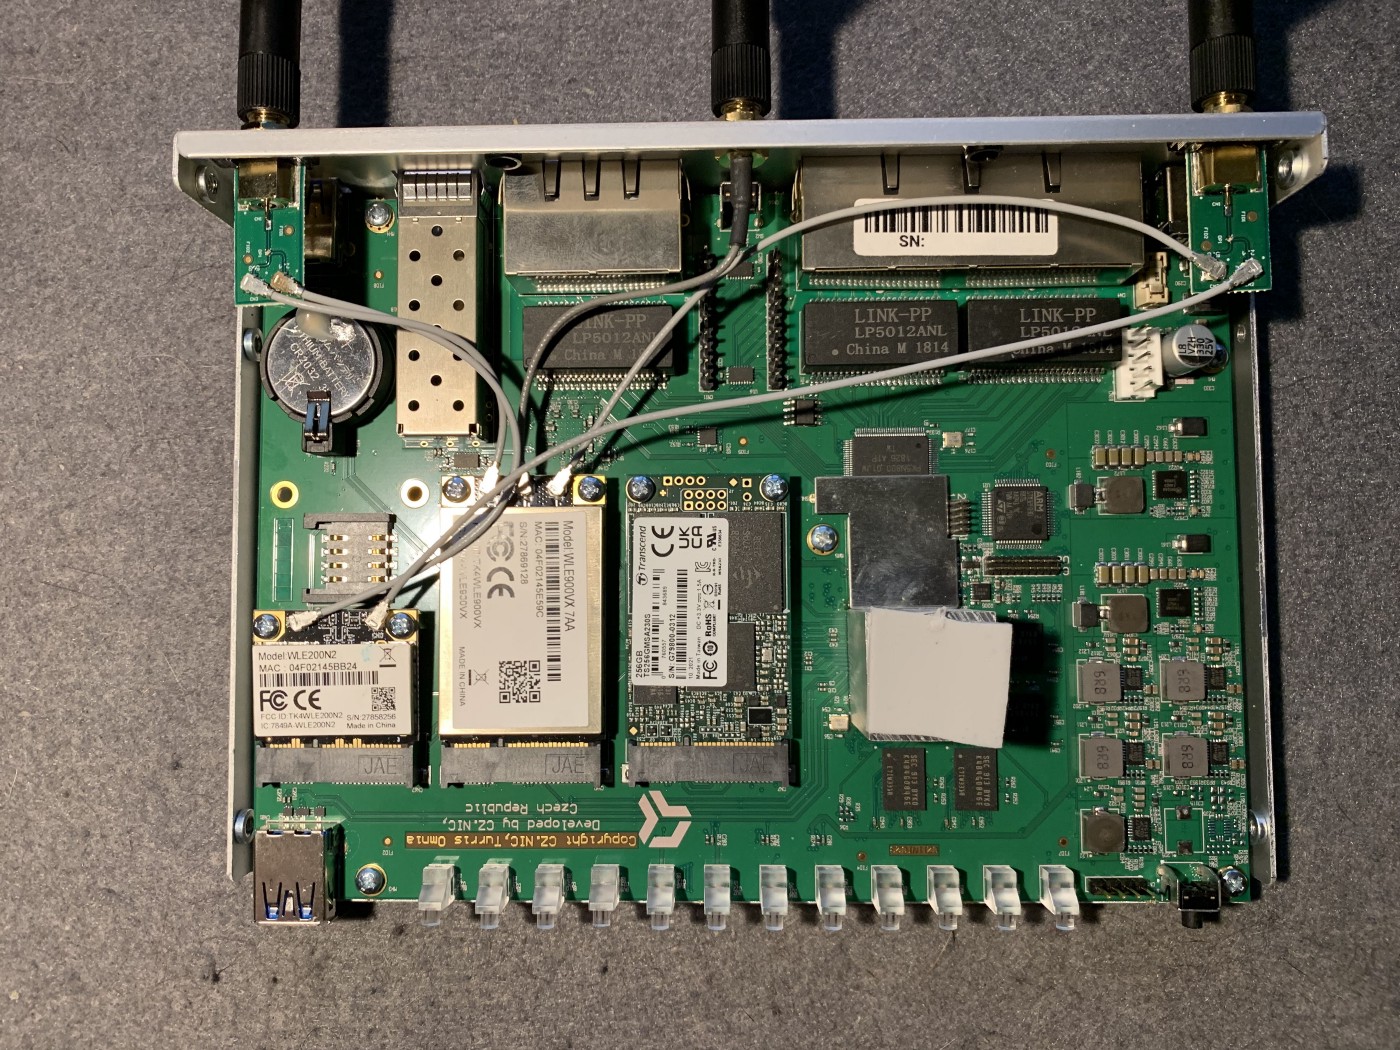
Close the chassis again and we’re done with the mechanical part 
Installing OpenWRT
Next, we will replace the default TurrisOS with OpenWRT. For this, I just downloaded the pre-built image (http://downloads.openwrt.org/releases/21.02.1/targets/mvebu/cortexa9/openwrt-21.02.1-mvebu-cortexa9-cznic_turris-omnia-sysupgrade.img.gz) for my router model onto my PC and copied the .img file to a FAT-formatted USB Flash drive.
To bring the Omnia into a rescue mode that allows us to install OpenWRT I used a 5-led reset, connected an Ethernet cable to port 4 of the Router and my PC, and manually gave the network interface an IP of 192.168.1.2. After that, I was able to SSH into the Omnia (192.168.1.1):
- Mount the USB Flash drive:
mkdir /mnt; mount /dev/sda1 /mnt - Flash the image:
dd if=/mnt/openwrt-21.02.1-mvebu-cortexa9-cznic_turris-omnia-sysupgrade.img of=/dev/mmcblk0 bs=4096 conv=fsync - Do a reboot.
- Done!
Now we can access the luCi web interface by pointing our browser to the routers IP:
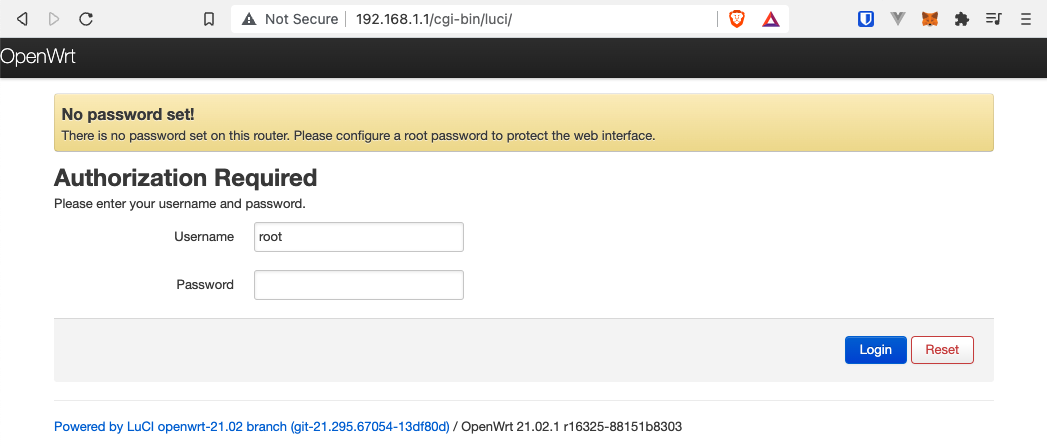
Also, you are now able to SSH into the router using the root user. So setting a password is highly recommended!
2. Configuring OpenWRT with Starlink
The hardest part of this tutorial:
- Set up your Starlink dish in a good spot
- connect the Ethernet cable that normally goes into your Starlink router to the WAN port of the Turris Omnia
- Done!
Since the dish automatically sets up a DHCP connection our custom router doesn’t need any configuration — it just works!
After your Starlink dish is finished aligning properly you should have a solid connection and access to the Internet.

3. Installing NKN
Now let’s get the NKN node working, shall we?
Formatting and mounting the SSD
In step 1 I installed the SSD accordingly. Now we need to prepare it so we can use it. When we cat the partitions available our “sda” SSD should show up:
cat /proc/partitions
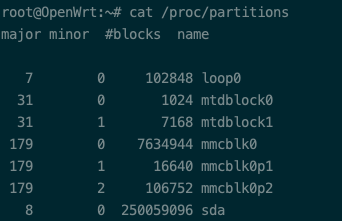
Let’s update our OS first
opkg update
And then install packages we will need throughout the process. Namely fdisk, btrfs-progs, block-mount, unzip, curl, and nano
opkg install fdisk btrfs-progs block-mount unzip curl nano
To format the SSD we use fdisk:
fdisk /dev/sda# fdisk /dev/sda
Welcome to fdisk (util-linux 2.25.2).
Changes will remain in memory only, until you decide to write them.
Be careful before using the write command.
Command (m for help): d
Selected partition 1
Partition 1 has been deleted.
Command (m for help): n
Partition type
p primary (0 primary, 0 extended, 4 free)
e extended (container for logical partitions)
Select (default p): p
Partition number (1-4, default 1): 1
First sector (2048-488397167, default 2048):
Last sector, +sectors or +size{K,M,G,T,P} (2048-488397167, default 488397167):
Created a new partition 1 of type ‘Linux’ and of size 232.9 GiB.
Command (m for help): w
Then we can add a filesystem to the partition:
mkfs.btrfs /dev/sda1
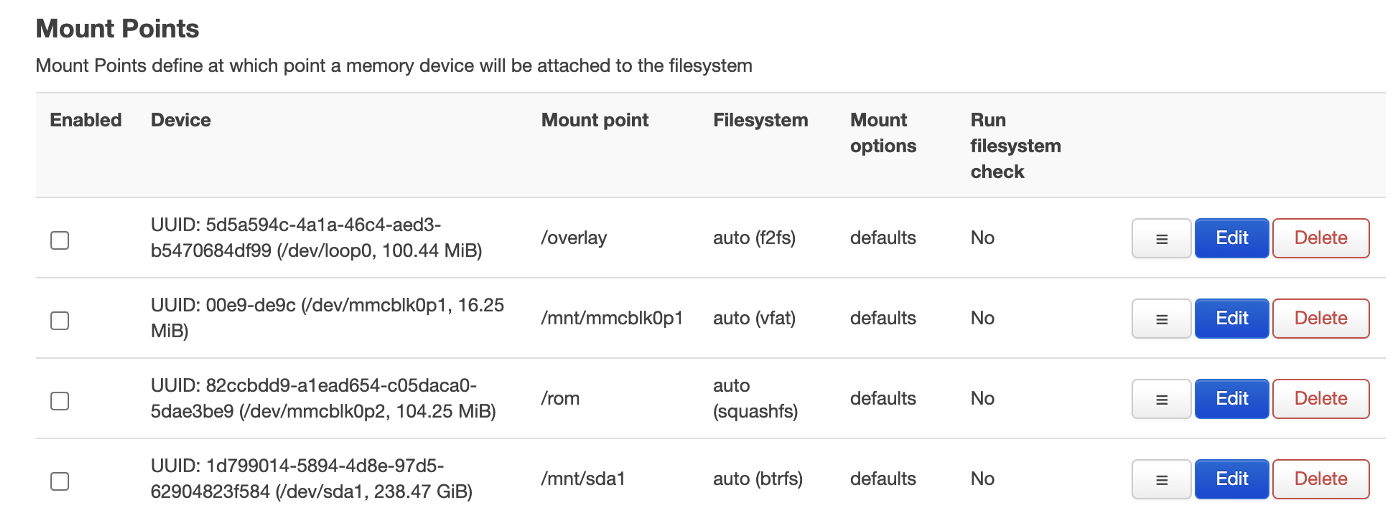
Finally, we need to mount the device to the file system. The easiest way to do this is in OpenWRT by selecting System > Mount Points.
Here, we can set mount points and enable them. On the “Mount Points” section we look out for /dev/sda1, click on Edit and click on “Enable”. After clicking “Save & Apply” the disk should be accessible under /mnt/sda1.
Install the NKN node software
We are now ready to install the NKN node software. We not only want to install it, but we also want to create a service that runs the node in the background so we don’t need to keep the SSH terminal on for the whole time. So this installation will be a little bit different from your average install.
We start with moving to the SSD…
cd /mnt/sda1
…and downloading the NKN node software from Github. Since the Turris Omnia has an armV7 architecture we download the right version.
curl — retry 10 -L -o “nkn.zip” "https://github.com/nkno
rg/nkn/releases/download/v2.1.7/linux-armv7.zip"unzip nkn.zip
Here comes the first smaller adjustment. We want to create an info file for the OpenWRT UCI system so that it only runs the service when the file is present and certain dependencies are met.
cd linux-armv7
mkdir setup
Create the info JSON file.
nano setup/info.json
Give it the following content:
{ “SerialNumber”: “”, “CurrentStep”: 0, “BinVersion”: “”, “SelfNode”: “http://127.0.0.1:30003”}
Now we do basic NKN stuff:
- Create a wallet and give it a password
./nknc wallet -p - Rename the config file:
mv default.json config.json - Add your beneficiaryAddr to the config.json
nano config.json - Done!
Finally, let’s rename the main NKN folder real quick:
cd …mv linux-armv7/ nkn
Okay, now we create a service file. This tells OpenWRT exactly where data is stored and how it should treat the service on default:
nano /etc/config/nkn
Give it the following content:
config nknoption enabled ‘1’option storage ‘/mnt/sda1’
Since the general config is done let’s create the service by creating a service file:
nano /etc/init.d/nkn
Add the following content:
#!/bin/sh /etc/rc.common
USE_PROCD=1
START=95
STOP=01
start_service() {
     [ “$(uci_get “nkn.@nkn[0].enabled”)” = “0” ] && return 0
     procd_open_instance
     procd_set_param command $(uci_get “nkn.@nkn[0].storage”)/nknd —p YOURWALLETPASSWORD --no-nat --config $(uci_get “nkn.@nkn[0].storage”)/nkn/config.json --wallet $(uci_get “nkn.@nkn[0].storage”)/nkn/wallet.json --log $(uci_get “nkn.@nkn[0].storage”)/nkn/Log --chaindb $(uci_get “nkn.@nkn[0].storage”)/nkn/ChainDB
     procd_append_param respawn 3600
     procd_append_param respawn 5
     procd_append_param respawn -1
     procd_close_instance
}
stop_service() {
     killall nknd
}
depends() {
     cat “$(uci_get “nkn.@nkn[0].storage”)/nkn/setup/info.json”
     echo
}
Lastly, let’s make the service executable:
chmod +x /etc/init.d/nkn
We can now use UCI to create an OpenWRT-conform service.
uci set nkn.@nkn[0].storage=/mnt/sda1
uci commit
nkn/etc/init.d/nkn enable
After that, a service called “nkn” should show up in your web interface (System > Startup). We can already start the service and check if it running. Your node won’t be reachable from the outside yet. So this is the next thing we will solve.
![]()
4. Port-forwarding and “Circumvent” CGNat
We already found out that Starlink uses CGNat for its routing system. Meaning you don’t have any possibility to expose ports to the public when using IPv4 addresses. Sadly NKN still uses IPv4 so we need to get creative on that.
The only reliable solution to that is tunneling your whole internet connection to a server that can forward ports and with that connect to the NKN network. This brings some positive aspects with it, too! Using a VPN prevents Starlink from seeing what pages you are visiting. So the goal we want to achieve looks like this:

Setting up an own VPN server
Because most of the VPN providers can’t forward user-defined ports I built my own OpenVPN Access Server. Remember the DigitalOcean Droplet we mentioned at the beginning? Now it’s his time to shine!
Installing an OpenVPN Server is very easy by just launching a Droplet that is publicly available on the DO Marketplace: https://marketplace.digitalocean.com/apps/openvpn-access-server. The “getting started” guide is pretty simple and self-explanatory so I won’t handle that here. Your OpenVPN Access server should be available under https://DROPLETIP:943/admin. And that is where we first head to make some configurations.
Setting up a DMZ
To be able to expose ports to the public we need to allow using a DMZ for the user. So let’s log into our OpenVPN Access Server admin panel and head to User Management > User Permissions — from there we click on the “More Settings” icon of the user “openvpn”.
Under the DMZ settings we switch to “Yes” and enter a list of IPs and ports:
STARLINK_PUBLIC_IP:tcp/30001
STARLINK_PUBLIC_IP:tcp/30002
STARLINK_PUBLIC_IP:tcp/30003
STARLINK_PUBLIC_IP:udp/30001
STARLINK_PUBLIC_IP:udp/30002
STARLINK_PUBLIC_IP:udp/30003
VPS_SERVER_IP:tcp/30001
VPS_SERVER_IP:tcp/30002
VPS_SERVER_IP:tcp/30003
VPS_SERVER_IP:udp/30001
VPS_SERVER_IP:udp/30002
VPS_SERVER_IP:udp/30003
After doing that we can Save our settings and point our browser to the user login available under https://DROPLETIP:943, log in with the “openvpn” user and download our connection profile.

All Server configurations done, let’s head to our Turris Omnia again.
Enabling VPN on the Turris Omnia
Let’s connect again to the Omnia via SSH and install some dependencies to get openVPN working in the web interface:
opkg update && opkg install openvpn-openssl luci-app-openvpn
A new page in the web interface should appear. Under VPN > OpenVPN you can now upload your connection profile you downloaded in the previous step.

After that click on “edit” to change some configuration properties of the connection. First add your username to the first line and your password to the second line of the text input field on the bottom.
Then, edit the line starting with “auth-user-pass” and append the file path shown in the description text.

You can now save your VPN connection and connect it.
Virtually “wiring” the VPN network
Now the last thing to do is telling the Router to use the VPN network by default. For this move to Network > Interfaces. Here, create a new interface called “tun0” and set the configurations according to the screenshots:
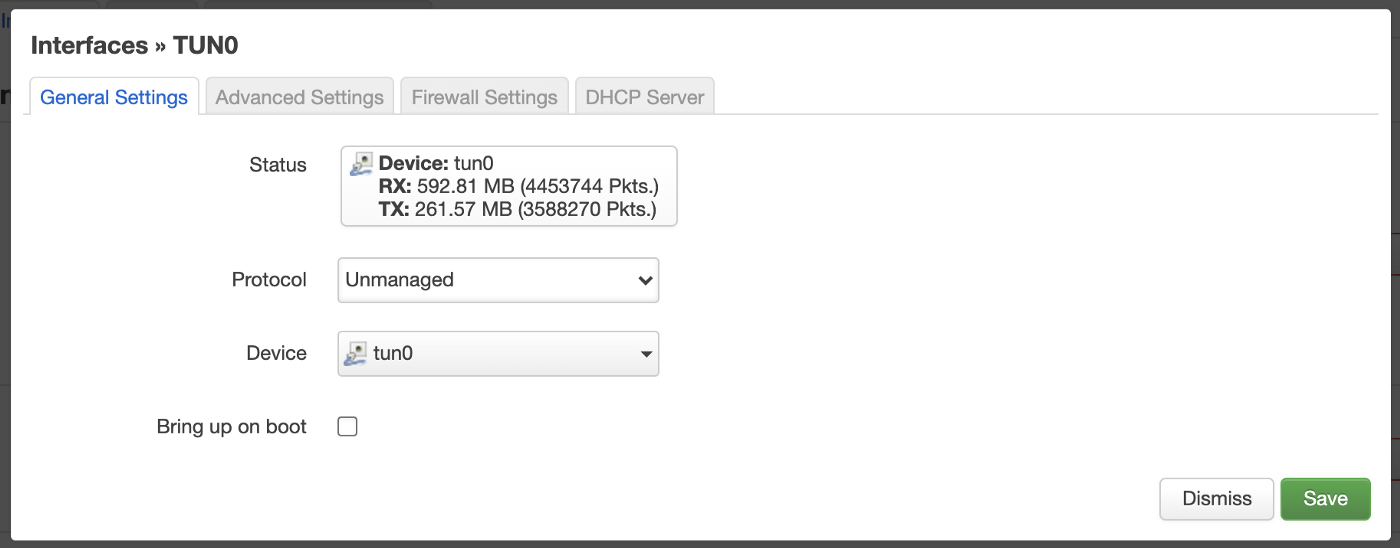
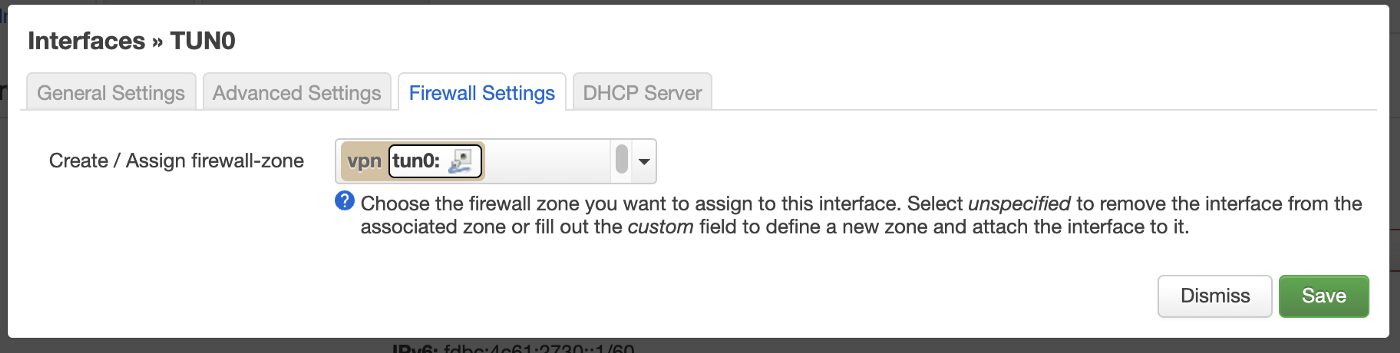
Note: this also created a new firewall zone we can use to modify the connection flow.
Next move to Network > Firewall. Here we configure forwarding rules and which zone can communicate to which. Here are my configurations for lan, wan and vpn:

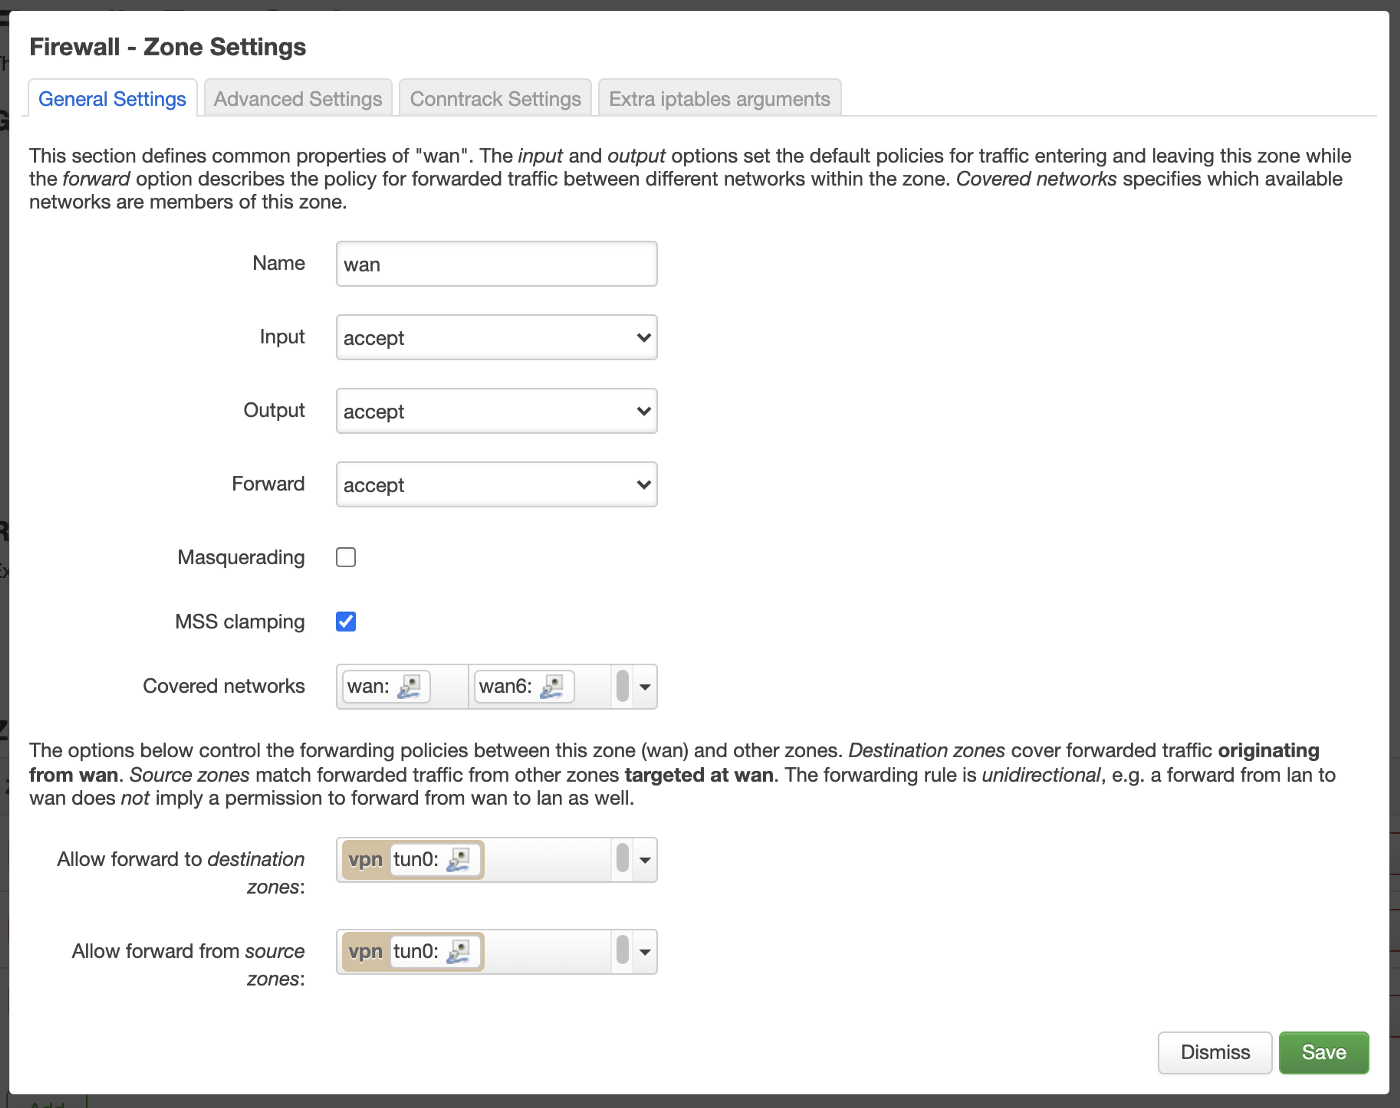
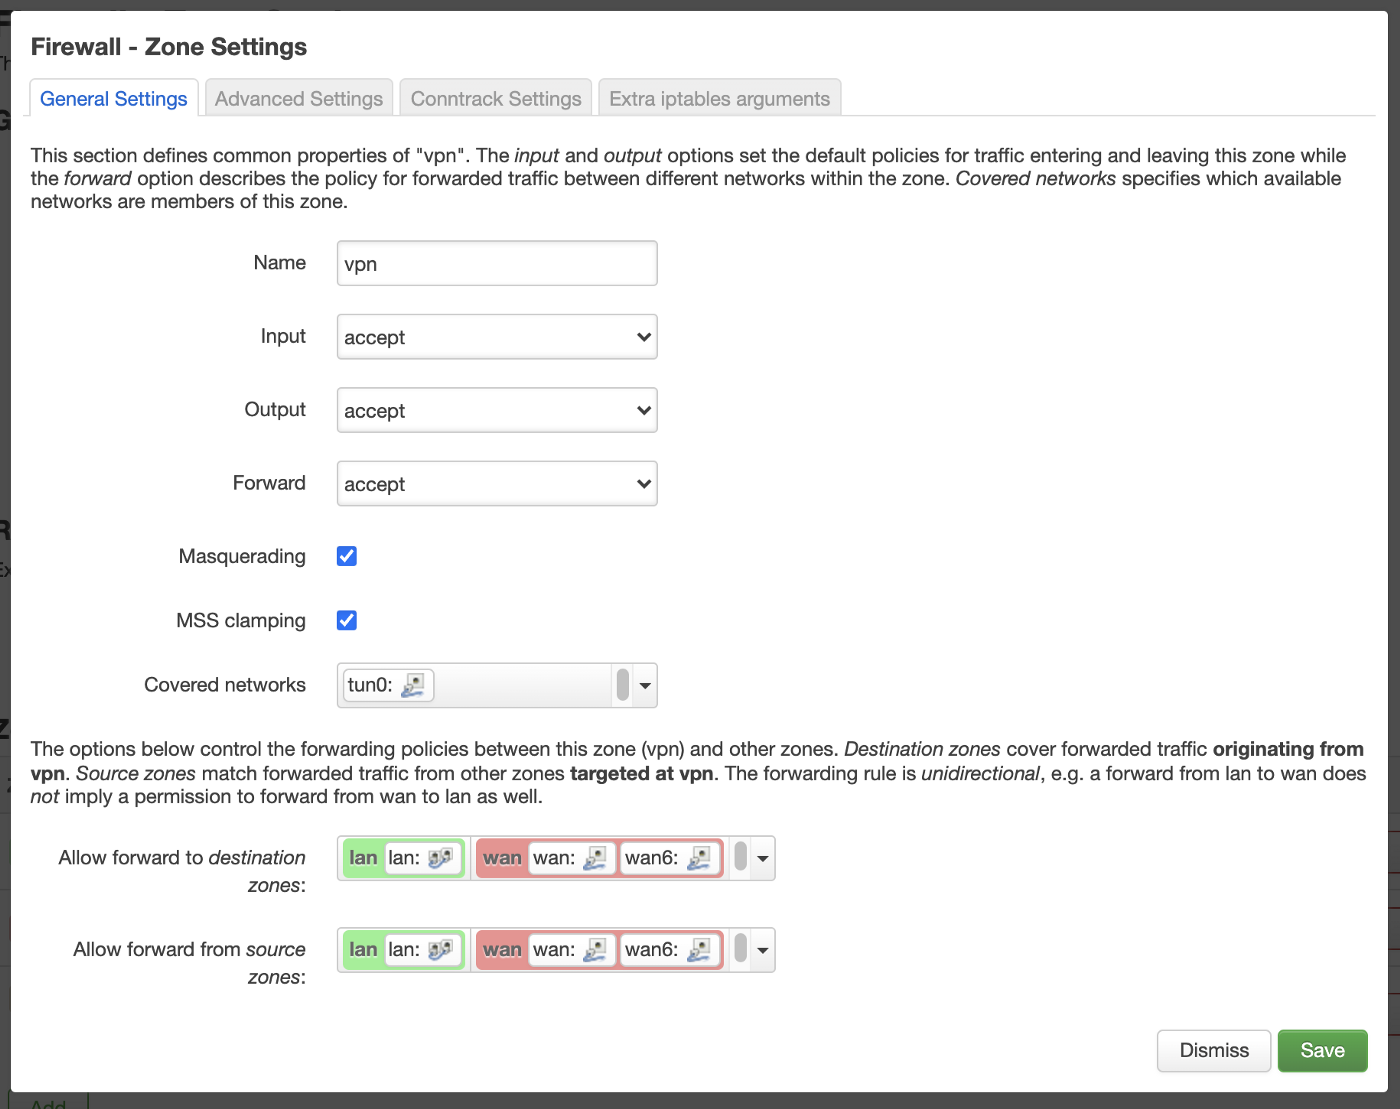
This sets the VPN network as a forwarding layer for WAN and LAN telling both networks to always use the VPN to forward packets in either ways.
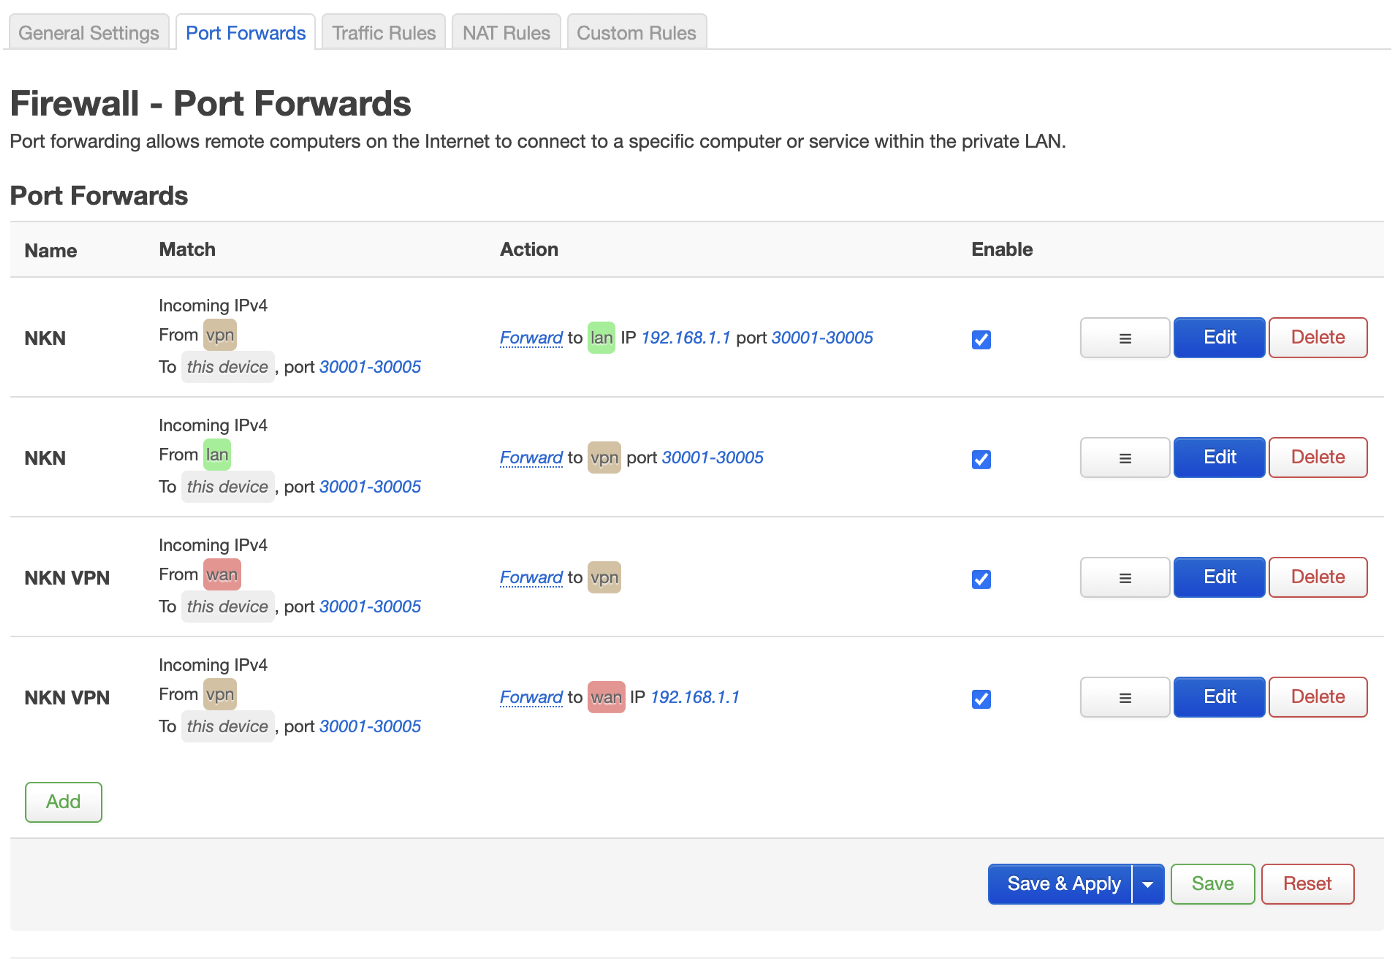
The port forwarding itself is pretty straightforward. Just make sure ports 30001 to 30005 are passed trough the VPN and back to make the magic happen.
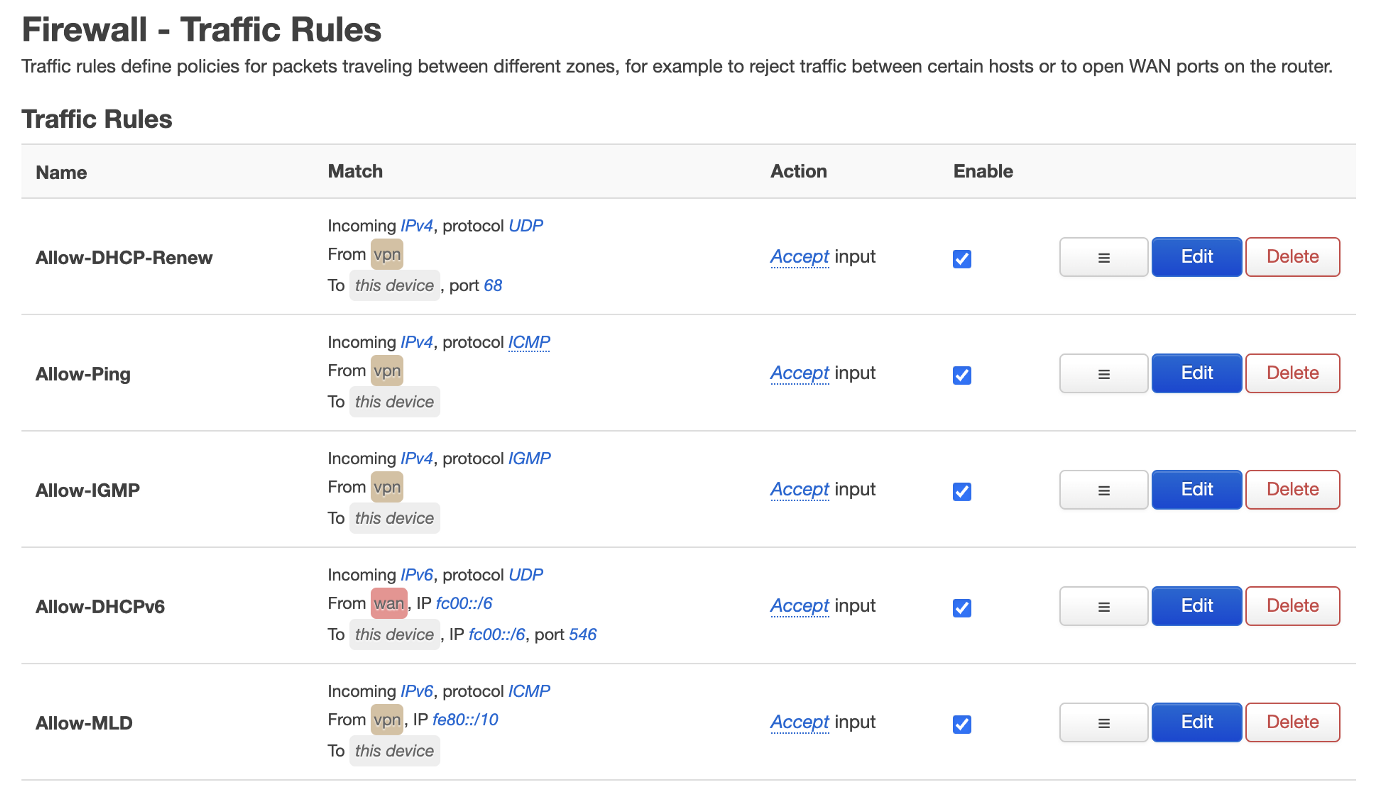
The last thing we need to do is to change some traffic rules. This is necessary to not shut off your network from DHCP and other important requests. Just replace the existing Allow-DHCP-Renew, Allow-Ping, Allow-IGMP and Allow-MLD WAN-entries with VPN:
That’s it! Your should now be able to surf the internet through your VPS Server’s IP! Check out https://whatsmyip.com/ to verify that. Also your NKN node should now be reachable there. If not you can always restart the service on the System > Startup menu.
5. Closing thoughts
Wow, what a ride! After some endless days of work, configuring and reading into network schematics I was able to run a NKN node built into a custom OpenWRT Router that is running over Starlink.
This article solved the major issues that you will have to deal with if you want to join me on my Satellite-Miner journey but also opens some problems the NKN team will need to cover in the future. The elephant in the room is the lack of IPv6 support. Since CGNat becomes the“de-facto” standard of today’s internet providers there needs to be a clear cut by using IPv6 instead of IPv4 in the next few years.
Also, there are many things to add and to improve for maybe other community members. A few of them are:
- Offering a opkg package for installing an NKN miner
- Providing an easy to use Web-Interface for the OpenWRT web interface
- Work more towards integrating the NKN miner software as a standard on hardware vendors machines.
Still we’re in the early days of Web3.0 but NKN is still one of the most promising projects due to its broad hardware capability and the chances it offers for building a new, decentralized internet.
Thanks for reading!