
Hello All,
I’ve been running couple of nodes on AWS, Google Cloud, DigitalOcean, and Alibaba Cloud. I recently tried Vultr and thought someone might want to try it out.
This is my referral link if you want to get $50 promotional credit:
Once you register, it will ask you to link your credit card. You can link and choose not to pay anything as well. You’ll still get $50 promotional credits for your VM instances. There are plenty other payment methods including Bitcoin!
Once you’ve logged in, you should see following image:
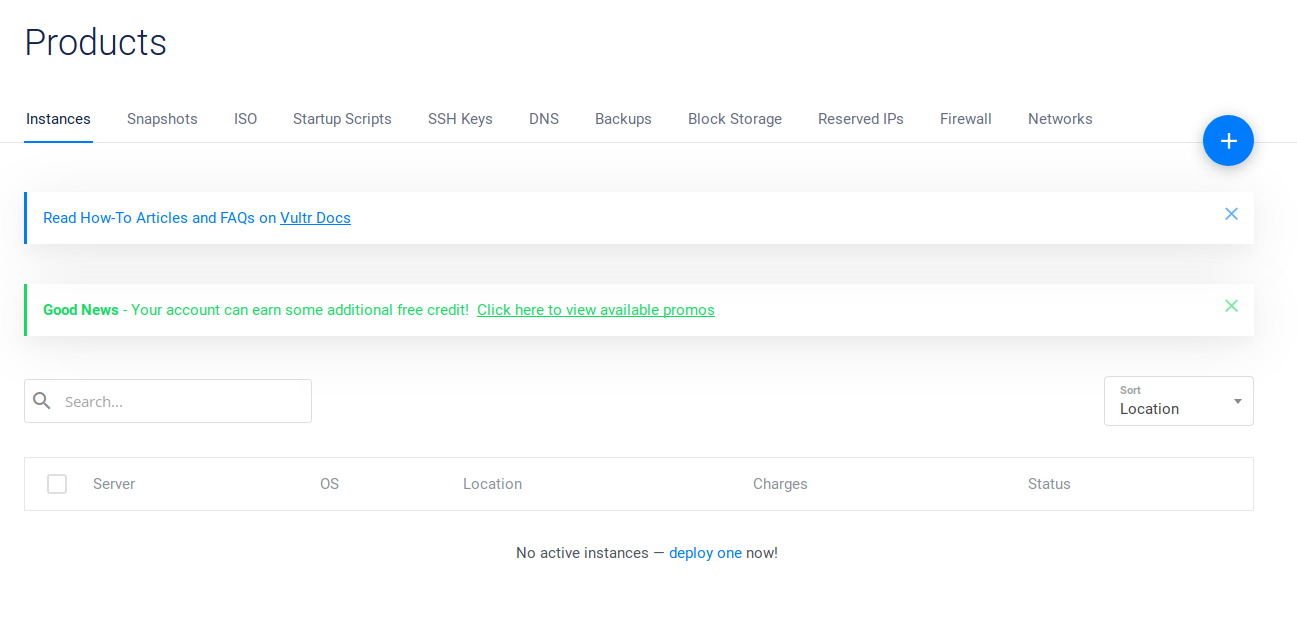
Click on that blue + icon to begin.
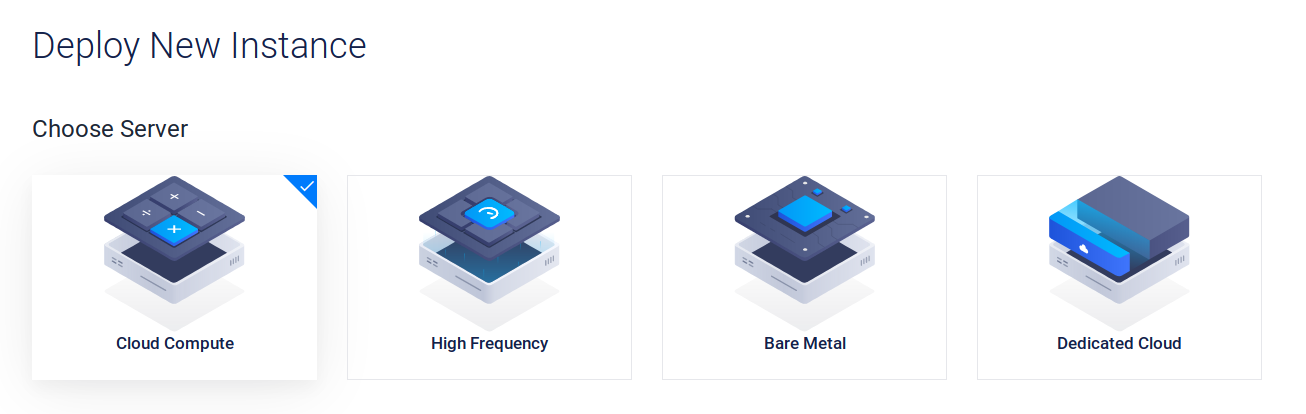
Chose “Cloud Computer” from the given list
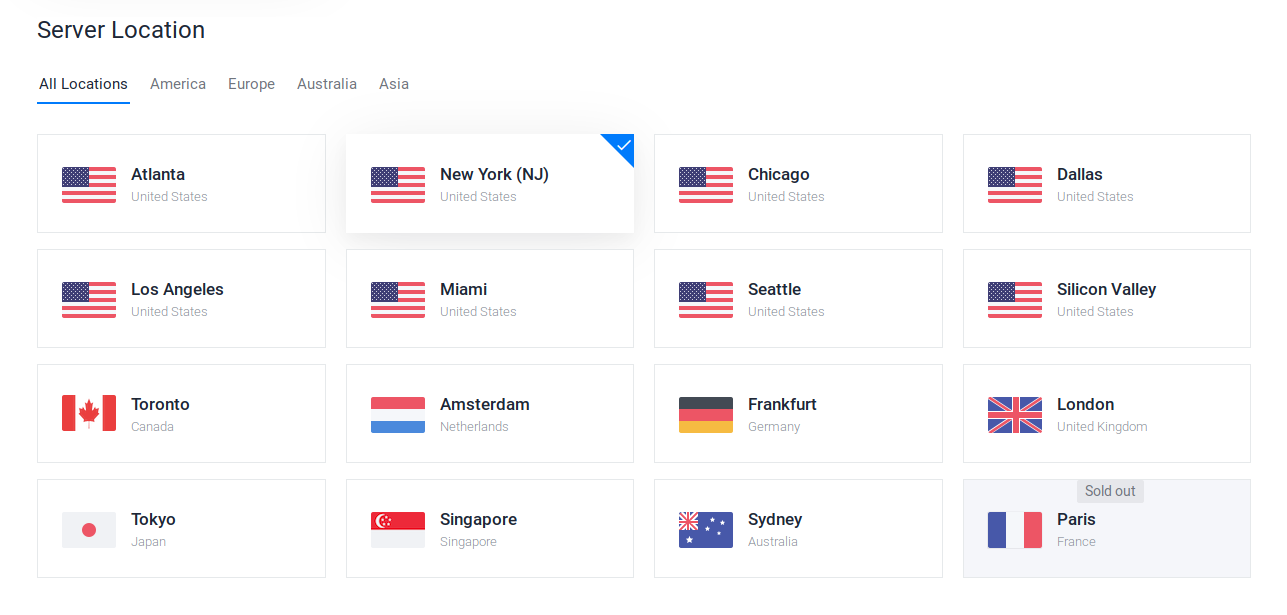
Now, for server location, they have plenty of different options compared to what DO offers. I’ll go with NY for the sake of this tutorial.
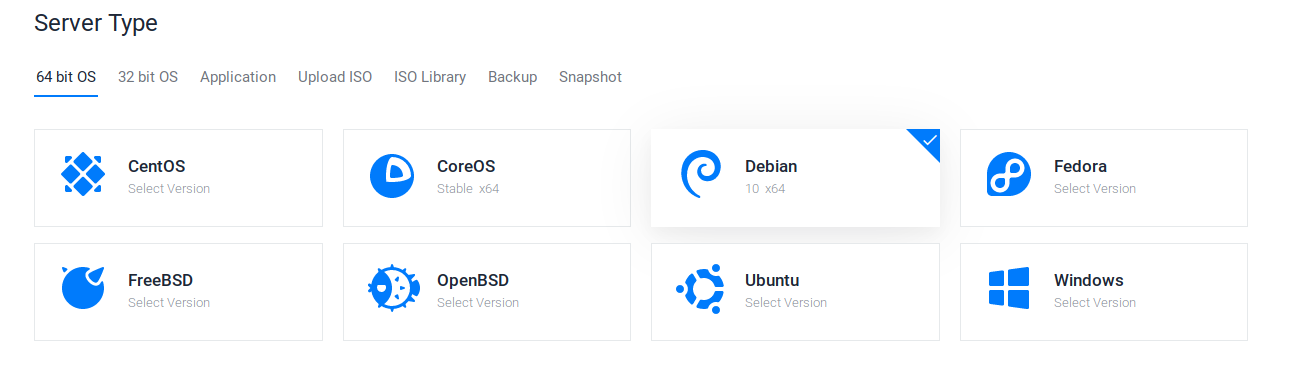
For server type, you can select anything you prefer.
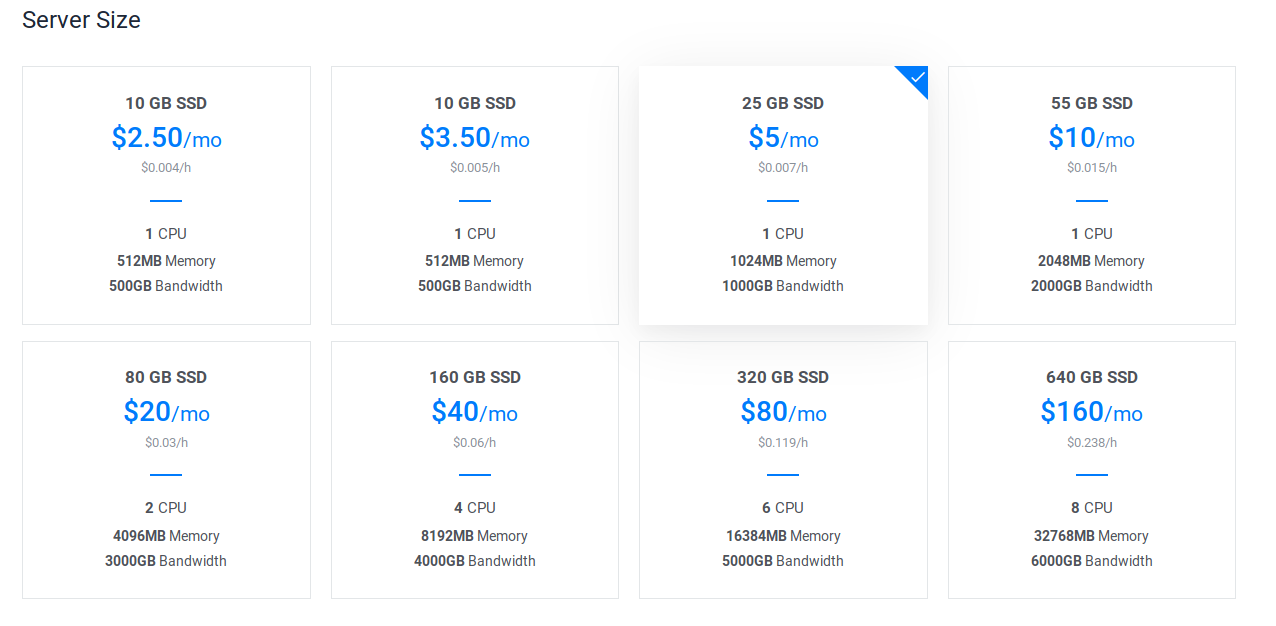
From the available server size, I’d recommend 1GB memory CPU which is $5/month.
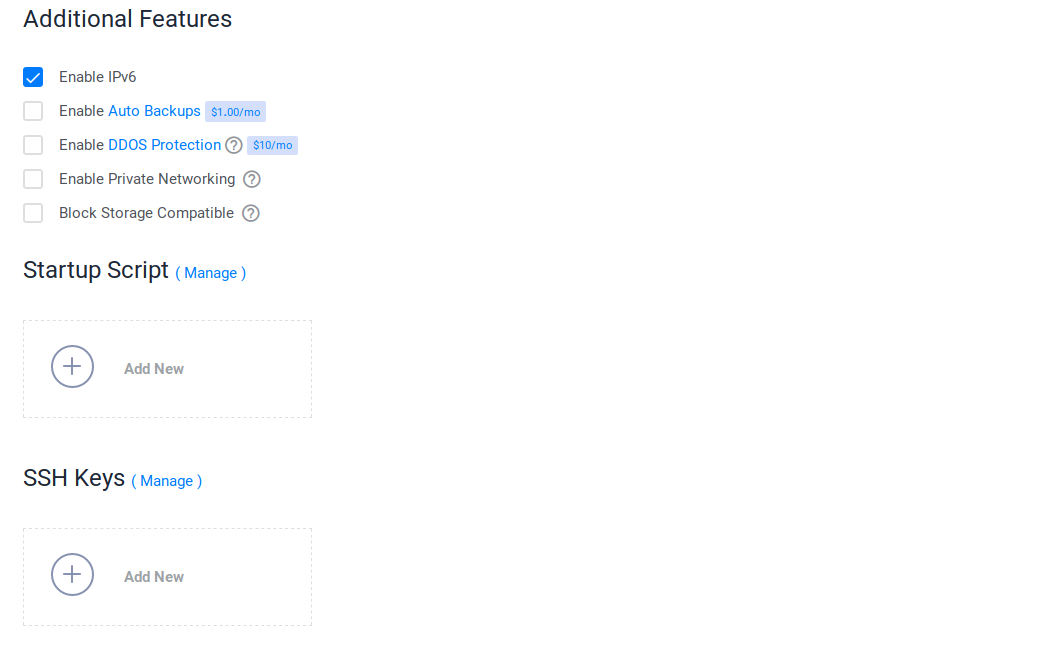
Select additional features as per your needs
And at the end, add Server Hostname and Label to easily identify them. I’d recommend adding SSH keys as well, but for now, we’ll go with the easiest possible route. You can deploy multiple server with this same configuration using “Server Qty” number roller.

I’m deploying one to show how to set nkn node after deployment, I’m going to merge almost all the guides I’ve been following and trying to put everything in a single place which will work well if followed properly.
After the setup is done, the instance status will be shown as “Running”, click on “…” icon to manage your instance.
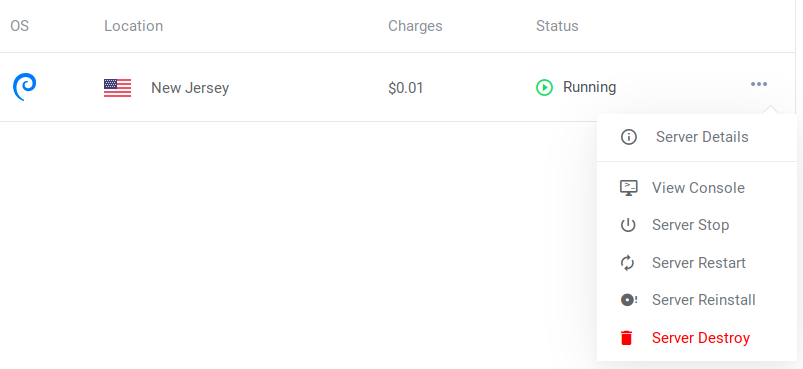
Click on Server Details

Once it’s up and running, start an ssh session using the details from the “Server Details” page, or you can use the console provided by Vultr for each instance.
Use this command if you want to establish ssh connection to the instance from your laptop/pc.
ssh username@instance-ip-address
Now, following part is from the guides available on medium and on this forum. If you’re well versed in using those guides, you don’t have to follow this any further. Otherwise, continue on…
Stage 1 - Environment Preparation
Once logged in, we need to update the debian and install the dependencies. This is required because we need to make sure that we have latest possible versions of all the available packages which may or may not contribute as dependencies for our nkn node.
Update the available list of packages and their versions (This doesn’t automatically install those packages)
sudo apt-get update
Now, install all those updated packages from the list
sudo apt-get upgrade
Now, we need some project specific packages to make sure we’re able to download nkn node code and build it on the system.
sudo apt-get install make curl git
It will ask you “Do you want to continue” stating that whatever you’re gonna install, it will use some diskspace. Press y and let it flowww. 
Now, before we dilly-dally with the instance, we should create a user which will be used to perform all the crazy actions we’re about to do… So let’s create a user first.
adduser nkn
This will create a new user named nkn . You can choose any other name you prefer. After that, we need to append that user into the sudo group.
usermod -aG sudo nkn
Now let’s go to our newly created user.
su - nkn
If it shows following, you’re set to go further…
nkn@YOUR-INSTANCE-LABEL-HERE:~$
Stage 2 : Go Installation And Path Setup
Now that we’re ready to begin the installation of our nkn node, we first need GoLang on our instance, because nkn node code is written in Go language, and to compile and build the node, we need the compiler. I’d recommend copying following code and paste it directly into the terminal, essentially this piece of code looks for latest Go installation on the server and downloads the archive.
url=`curl https://golang.org/dl/ | grep linux-amd64 | sort --version-sort | tail -1 | grep -o -E "https://dl.google.com/go/go[0-9]+\.[0-9]+((\.[0-9]+)?).linux-amd64.tar.gz"`
And now enter this command to get the package from the url
wget ${url}
Once done, enter following command to let the Go installation begin. It will ask you user password. Enter the password and the installation will begin.
sudo tar -C /usr/local -xvf `echo ${url} | cut -d '/' -f5`
It shouldn’t take more than 20-30 seconds.
Now that our installation has been finished, we need to make sure that go is present in the path so anyone can access go from anywhere without pointing to go directory. For that, we will add those path into bashrc file and resource it.
cat >> ~/.bashrc << 'EOF'
After you enter above command, next line will be “>>” only, expecting input from user till user enters EOF.
export GOPATH=$HOME/go
export PATH=/usr/local/go/bin:$PATH:$GOPATH/bin
EOF
Now we need to re-source our bashrc file to make sure the paths we added are considered
source ~/.bashrc
Now let’s type following command to make sure our actions paid out.
go version
It should give you following output
go version go1.12.7 linux/amd64
If it does, congratulations, we’re half way through…
Step 3: NKN Code Download, Binary Building
Let’s make the required directories and download the nkn code from the github
mkdir -p ~/go/src/github.com/nknorg && cd ~/go/src/github.com/nknorg
Clone the nkn github code
git clone https://github.com/nknorg/nkn.git
Now that we have our code, let’s change the directory to nkn and fire up build command
cd nkn && make
Stage 4: Configuration, Wallet Setup, Start Miner
After the build is finished, we need to copy the configurations for nknc and nknd to use
cp config.mainnet.json config.json
Update your beneficiary address where you want to receive your mining rewards
nano config.json
Put your address like this, then save the file and exit (Ctrl + X -> Save? -> Yes -> Confirm Filename -> Enter -> Done)
{
  "BeneficiaryAddr": "YOUR-NKN-WALLET-ADDRESS-HERE",
  "SeedList": [
    "http://mainnet-seed-0001.nkn.org:30003",
    "http://mainnet-seed-0002.nkn.org:30003",
    "http://mainnet-seed-0003.nkn.org:30003",
    "http://mainnet-seed-0004.nkn.org:30003",
    "http://mainnet-seed-0005.nkn.org:30003",
    "http://mainnet-seed-0006.nkn.org:30003",
....
Now, we need to create a new wallet using nknc utility, because it it needed for miner to run properly. Although your mining rewards will be forwarded to whatever you’ve added in “BeneficiaryAddr” in config.json file, it’s still required to create wallet using nknc…
./nknc wallet -c
It will ask you to add new wallet password
Note: This password will be used to run nkn service and miner, so don’t forget it.
and once you’ve done that you’ll be presented with wallet address and public key of that wallet.
Alright, we’re ready to fire up our mining node now. Add following command into the console.
./nknd -p YOUR-WALLET-PASSWORD
You’ll see the logs coming in, and your miner is working now. Check on https://explorer.nknx.org/ips after a few minutes to see it start syncing the blocks.
Stage 5 (Optional): Creating NKN System Service
Now, often times I saw that people complaining about mining being stopped once they exit their ssh session. Many of the times, the reason was that they forgot to create a service which shall run in the background and don’t need any interaction from the user. And fortunately, those medium guides had this part figured out. So here it is.
Ctrl + C if you’re still mining after following above steps.
Go to the root folder using this command and create a new file called nkn.service
cd ~ && nano nkn.service
Write following code inside the file and save it.
[Unit]
Description=nkn
[Service]
User=nkn
WorkingDirectory=/home/nkn/go/src/github.com/nknorg/nkn
ExecStart=/home/nkn/go/src/github.com/nknorg/nkn/nknd -p YOUR_WALLET_PASSWORD
Restart=always
RestartSec=3
LimitNOFILE=500000
[Install]
WantedBy=default.target
Note: Wherever it says “YOUR_WALLET_PASSWORD”, you should use the password you added while creating the wallet using ./nknc utility
Flashback --> ./nknc wallet -c … Remember?
Now let’s add it into system and enable it so that it can run on it’s own, and even restart if encountered any failures.
sudo cp nkn.service /etc/systemd/system/nkn.service
sudo systemctl enable nkn.service
It shall give you an output:
Created symlink /etc/systemd/system/default.target.wants/nkn.service → /etc/systemd/system/nkn.service.
Now reboot the system and relax. Once it restarts, it’ll automatically start the nkn.service and your miner will begin. (Allow it 10 minutes before you complain “OFFFLLLIINNEEE”  , because I’ve been there )
sudo reboot
Stage 6 (Optional): Auto Updater Script
Now, I’ve seen another complaint that suddenly their node went offline. This happens due to a lot of reasons, one of which is code release. If developers release new nknc and nknd, you need to update yours to make sure your nodes run with proper version and are up-to-date.
Let’s create an auto updater so you don’t lose your sleep or hair worrying about your offline nodes. 
Let’s go to root directory and create a file called nkn-updater
cd ~ && nano nkn-updater
Write below code into the file and save it. The code simply checks whether our local git repo is up-to-date with the one present on github. If not, UPDATEEEE…
HOME=/home/nkn
GOPATH=$HOME/go
PATH=/usr/local/go/bin:$PATH:$GOPATH/bin
cd $HOME/go/src/github.com/nknorg/nkn
git fetch &>/dev/null
LOCAL=$(git rev-parse HEAD)
UPSTREAM=$(git rev-parse @{u})
if [ $LOCAL != $UPSTREAM ]
then
        systemctl stop nkn.service;
        git merge;
        make deepclean;
        make;
        chown -R nkn:nkn $HOME/go;
        systemctl restart nkn.service;
fi
Now, we need this updater to run atleast once everyday so our node stays updated. Let’s make this file executable first.
chmod +x nkn-updater
Now, let’s add it into crontab for cron daemon to pick it up exactly at mid-night and execute it.
sudo crontab -e
When you enter the command, it will ask you about which editor you’d like to use. I’m pretty sure that default one would be nano, so press enter and it should use nano as default.
After the file opens up, go to the last line of the file and append following line.
00 12 * * * /home/nkn/nkn-updater >/dev/null 2>&1
And that’s it!!
Congratulations… You’re node shall be up and running by now… Enjoy…!!
Additional Notes:
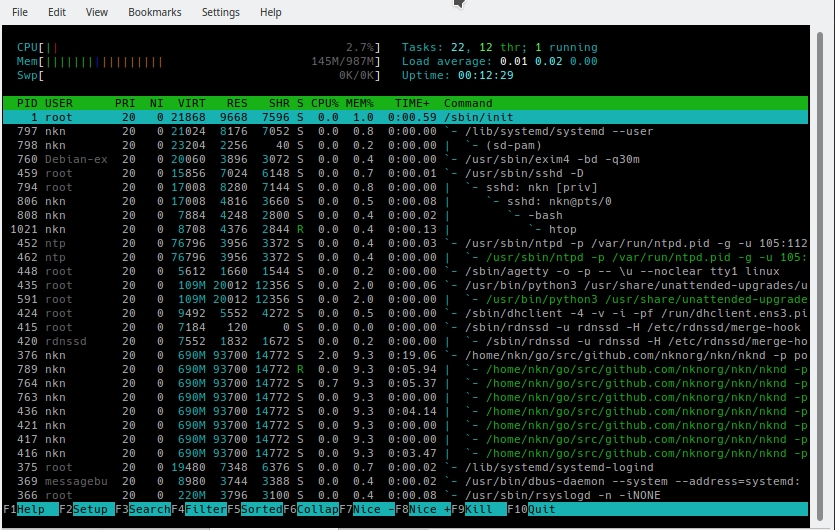
Install htop utility to view currently running processes, and make sure you’re miner is running correctly.
sudo apt-get install htop
Example:
Please let me know if you find any mistakes in this tutorial. I have used following guides to come up with this one…
All Credits go to these people who originally created these guides and helped me in figuring out how to create my own node. Thank you…!! 
Have a great day…!!